
Some links in this guide are affiliate links, if you buy through them we may earn a small commission at no extra cost to you. Here’s our disclosure.
Quick Answer
A garage organization before and after comes down to three steps in order: declutter everything into keep, donate, sell, or toss; divide the space into activity zones like tools, sports, lawn, and seasonal; then add vertical storage to hold each zone. Done over one focused weekend, it turns a cluttered garage into a parkable one.
You open the garage door hoping to grab one thing, and there it is again: the wall of bins you meant to sort, the bikes leaning on the lawn tools, the boxes you have not opened since the move. There is a car-shaped space in the middle, but the car has not parked there in months. Every few weeks you promise yourself a "quick tidy," spend a sweaty Saturday shoving things into new piles, and by the next season it looks exactly the same. The problem is not that you are messy or lazy. It is that a garage collects the overflow of the entire house, seasonal gear, hardware, sports equipment, donations in limbo, with no system telling any of it where to live. A pile you reshuffle is still a pile. What actually changes a garage is a plan you can see, follow, and finish.
What does a garage organization before and after actually take?
A real garage organization before and after takes three things in order: a full declutter, a zone plan, and the right storage to hold it, usually across one focused weekend, not a single afternoon. The dramatic "after" photos you save are never the result of buying more bins first. They come from emptying the space, deciding what earns a spot, grouping what stays into categories, and giving each category a defined home on a wall, shelf, or labeled bin. Skipping the declutter is why most attempts fail: you end up organizing clutter instead of removing it, and the piles simply move. Budget a weekend, recruit a helper for the heavy lifting, and work the sequence in that order. Do it once, properly, and the maintenance afterward is minutes a week. The transformation is less about the products and far more about the plan behind them. Think of the before-and-after as a decision project, not a cleaning one: most of the work is choosing what stays, and the storage only holds those decisions in place. That reframe matters, because the same garage can look transformed one month and reverted the next if the decisions were never actually made, which is why we start with the plan, not the bins.
How do you capture an honest "before"?
Start by photographing the garage from every corner and actually measuring the space before you move a single box. The "before" is not just clutter to be embarrassed about, it is your data. Photos force you to see the room the way a stranger would, which surfaces problems you have stopped noticing: the wasted vertical space above the door, the dead corner behind the freezer, the shelf holding empty boxes. Measure your wall lengths, ceiling height, and how much floor the car actually needs, so you know what will fit before you buy anything. Then write down how you want to use the space: park a car, run a workshop, store holiday decor, keep a garden station. That intended purpose decides everything downstream, because a garage that has to fit a car is organized very differently from one that is really a workshop. Note your problem spots too, the corner that always fills with bags, the shelf that avalanches, so the new plan solves them on purpose. A clear before, pictured and measured and defined, is what makes the after possible, and it hands you the satisfying comparison shot at the end.
What zones should you divide the garage into?
Divide the garage into activity-based zones so every item has an obvious address instead of landing in the nearest gap. The most reliable layout groups similar things together and puts frequently used gear near the door. Here is the zone-by-zone breakdown this free printable plan uses:
| Zone | What lives here |
|---|---|
| Everyday access | Trash and recycling, shoes, dog leash, reusable bags |
| Sports & recreation | Bikes, balls, camping gear, pool and beach items |
| Lawn & garden | Mower, rakes, hoses, pots, potting soil, fertilizer |
| Tools & workshop | Power tools, hand tools, hardware, workbench |
| Seasonal & holiday | Decorations, coolers, winter gear, in clearly labeled bins |
| Household overflow | Paper goods, pantry backup, cleaning supplies |
Keep heavy items low, light and seasonal items high, and reserve the wall nearest the door for what you reach for daily. Assigning zones on paper first, before you haul anything back in, means you place things once instead of reshuffling for hours. As you settle each zone, sketch it straight onto the plan so the layout is locked in before anything goes back, and write the zone name on the bin labels while you are at it. A garage that is legible to the whole household, not just to you, is the one that stays organized once the initial motivation fades.
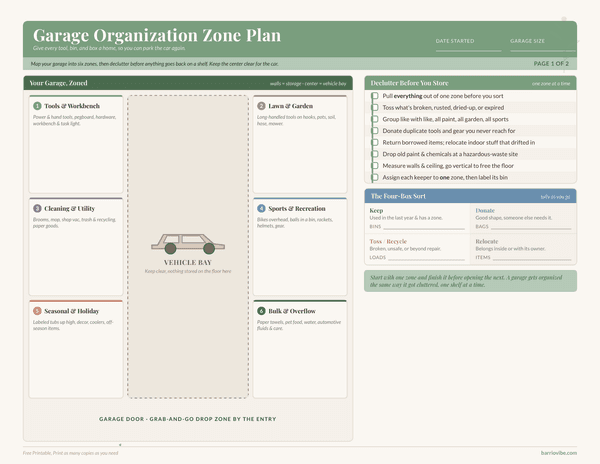
Garage Organization Zone Plan, Free Printable
A free printable garage organization zone plan that maps your garage into six storage zones, plus a declutter-before-you-store checklist, cut-out bin and shelf labels, and a what-goes-where inventory tracker.
How do you declutter the garage before you store anything?
Empty the zone you are working on completely, then sort every item into four groups so nothing gets stored by default:
- Keep, you use it, it works, and it fits your intended purpose for the space.
- Donate, usable but no longer needed; load it in the car the same day so it actually leaves.
- Sell, worth listing this week, not "someday"; give it a deadline or it becomes clutter again.
- Trash or recycle, broken tools, dried-out paint, empty boxes, and mystery hardware.
This four-pile pass is the step people skip and the exact reason garages backslide, so do it before you buy a single organizer. Work in sections rather than dragging everything onto the driveway at once, one wall or one corner at a time keeps the job from swallowing the whole day and from getting rained out. Be honest about duplicates, dead hobbies, and the "might need it someday" items that quietly eat your floor. As you clear each zone, group the keepers into the categories you defined so they are ready to store, not just re-stacked. What remains is only what has earned a permanent home. Snap a quick photo of each cleared zone as you finish it, watching the empty floor reappear, one corner at a time, is the motivation that carries you through the next section.
What storage turns the plan into a lasting "after"?
Get things off the floor first, vertical storage is what makes a garage look transformed and stay that way. Once your zones are decided and clutter is gone, wall-mounted systems do the heavy work: a track or pegboard wall for hand tools, sturdy shelving up high for seldom-used bins, and hooks for bikes, ladders, and hoses that otherwise eat floor space. For everything that stacks, a set of matching clear storage bins with tight lids keeps seasonal gear dust-free and visible, and a roll of weatherproof labels means no one has to open six boxes to find the holiday lights. Group by zone, label the front of every bin, and store the heaviest items at knee height so nothing becomes a hazard. The goal is simple: an open floor, a parkable car, and a wall you can scan in seconds. That visible order is exactly what separates a real after from a temporary tidy. A quick wall-zone starting point:
- Pegboard or track wall, hand tools, tape, cords, and small hardware kept in sight.
- Overhead or high shelving, holiday bins, luggage, and off-season gear you rarely touch.
- Wall hooks and racks, bikes, ladders, hoses, and folding chairs off the floor.
- A base cabinet or bin tower, paint, chemicals, and anything hazardous up out of kids' reach.
How do you keep the garage organized after the transformation?
Protect the after with a fast monthly reset and a strict one-in, one-out habit. The transformation only lasts if new clutter has nowhere to accumulate, so put back what drifts out of place before it snowballs, ten minutes once a month is usually enough when every item already has a zone. Keep a donate bin near the door and add to it the moment something stops earning its spot, so the overflow leaves continuously instead of piling up for the next big purge. Do a slightly deeper reset each season, when you are already swapping summer and winter gear, and re-check that labels still match what is inside. Get the whole household on the same page, too: a system only holds if everyone knows where things go, which is exactly why the labeled zones matter more than the bins themselves. If the garage is your whole-house project this season, our guide to building a garage storage system covers the wall and shelving layout in detail, and if the budget is tight, these garage organization ideas on a budget get you the same after for less. Print the plan, work it once, and the upkeep stays measured in minutes.
Garage Organization Zone Plan, Free Printable
A free printable garage organization zone plan that maps your garage into six storage zones, plus a declutter-before-you-store checklist, cut-out bin and shelf labels, and a what-goes-where inventory tracker.
Tape the finished plan inside the garage door, snap your after photo next to the before, and let the zones do the deciding. A garage you can actually park in is built from one clear plan, not one more Saturday of shuffling piles.
Frequently Asked Questions
Where do you start with a garage before and after?
Start by emptying and photographing the space, then declutter into keep, donate, sell, and trash piles before buying anything. Only after the clutter is gone do you assign activity zones and add storage. Decluttering first is what makes the after last instead of reverting within a season.
How long does it take to organize a garage?
Most single-car and two-car garages can be transformed in one focused weekend, roughly 8 to 12 hours split across two days. Break the space into zones and tackle one wall or corner at a time so the job never gets rained out or abandoned half-finished on the driveway.
How do you organize a garage on a budget?
Declutter first, since removing what you do not need is free and cuts how much storage you have to buy. Then prioritize vertical space with inexpensive wall hooks, a pegboard, and secondhand shelving, and reuse boxes you already own. Add matching clear bins gradually as the budget allows.
What are the best zones for a garage?
Group items by activity: everyday access near the door, sports and recreation, lawn and garden, tools and workshop, seasonal and holiday, and household overflow. Keep heavy items low, seasonal bins high, and the most-used gear closest to the door so nothing lands in the nearest empty gap.
How do I keep my garage organized after cleaning it out?
Use a strict one-in, one-out rule and a fast ten-minute monthly reset to put drifting items back in their zones. Keep a donate bin by the door for continuous overflow, and do a deeper reset each season when you swap summer and winter gear and re-check the labels.