Some links in this guide are affiliate links, if you buy through them we may earn a small commission at no extra cost to you. Here’s our disclosure.
Quick Answer
Declutter your kitchen zone by zone, not all at once: work through one small area at a time, junk drawer, food containers, under the sink, pantry, counters, and fridge, removing anything broken, expired, duplicated, or unused for a year. Download the free printable checklist and finish one zone before starting the next.
You open a drawer to find a spatula and end up excavating three broken can openers, a fistful of takeout chopsticks, and a lid that fits nothing you own. The counters have become a landing strip for mail, vitamins, and that one appliance you swore you'd use weekly. Every cabinet is full, yet somehow there's never room for the thing you actually reach for. If your kitchen feels cluttered no matter how many times you "tidy," it isn't because you're messy or behind. It's because the room does more jobs than any other space in the house, cooking, eating, homework, mail sorting, snack raids, and stuff accumulates faster than you can put it away. Wiping the counters doesn't fix it, because the problem isn't the surface. It's the volume of things competing for a finite amount of space, with no system deciding what earns a spot.
Where should you start decluttering your kitchen?
Start with one drawer or one shelf, not the whole room, small, finished zones beat an all-at-once overhaul that stalls halfway. The best decluttering ideas kitchen owners actually finish begin with a fast, high-visibility win: the infamous junk drawer or the mismatched-lid cabinet. Clear it completely onto the counter, wipe the empty space, then put back only what belongs there and works. Everything else gets sorted into three piles: trash, donate, and "belongs elsewhere." The reason to start small is momentum. A single empty, organized drawer proves the process works and gives you the visual payoff that fuels the next zone. Trying to gut the entire kitchen in one afternoon almost always ends with every surface covered and no energy left to reassemble it, so the room ends up worse than when you began. One zone, fully finished, is the foundation everything else builds on.
What is the zone-by-zone method for decluttering a kitchen?
The zone-by-zone method breaks the kitchen into small, defined areas and clears them one at a time, so you always finish what you start. Instead of "declutter the kitchen," you tackle a sequence of ten-to-twenty-minute targets, each with a clear finish line. Work in the order below and check off each zone as you complete it:
| Zone | What to clear |
|---|---|
| Junk drawer | Dead pens, twist ties, random keys, expired coupons |
| Food storage containers | Lidless bases, stained tubs, warped plastic |
| Under the sink | Empty bottles, duplicate cleaners, old sponges |
| Pantry & dry goods | Expired food, stale snacks, duplicate opens |
| Countertops | Appliances you use less than monthly |
| Utensil & gadget drawers | Duplicates, single-use tools, broken items |
| Mugs, cups & water bottles | Chipped, orphaned, or never-used |
| Fridge & freezer | Expired condiments, mystery leftovers |
Finishing one zone before opening the next is the whole trick, it keeps the chaos contained and the wins visible.
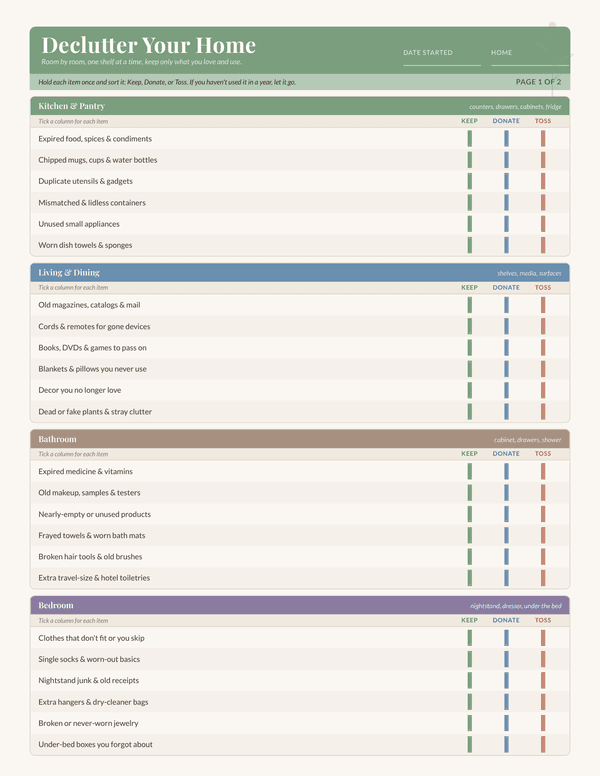
Declutter Your Home Checklist, Free Printable
A room-by-room decluttering checklist with Keep, Donate, and Toss columns plus twelve 20-minute declutter zones, so you can clear the clutter from your whole home one shelf at a time.
What should you get rid of when decluttering a kitchen?
Get rid of anything broken, expired, duplicated, or unused for a full year, those four categories cover the vast majority of kitchen clutter. Be honest about the specifics: chipped mugs and orphaned water-bottle lids, warped food-storage containers missing their tops, and the third garlic press you forgot you owned. Toss expired pantry items and condiments crusted around the cap, plus the "someday" gadgets, avocado slicers, quesadilla makers, single-use gizmos, that have never earned their drawer space. Free promotional cups, takeout utensils, and stray sauce packets can all go. A useful test: if you had to rebuy it today, would you? If not, and it isn't sentimental, release it. The goal isn't a bare, minimalist kitchen, it's a kitchen where every item left has a job and a home. Clearing the dead weight is what finally makes room for the things you reach for every day.
How do you keep kitchen counters clutter-free for good?
Give every counter item a home somewhere else, and treat the counter as workspace, not storage. Clear countertops are the single biggest visual upgrade in any kitchen, and they stay clear only when nothing lives there by default. Keep out just the two or three appliances you genuinely use daily, the coffee maker, maybe the toaster, and relocate the rest to a cabinet. The mail, keys, and paperwork that drift onto the counter need a dedicated drop zone elsewhere, or they'll always come back. A quick nightly reset helps: spend two minutes returning stray items to their homes before bed so you wake up to a clean slate. If you're working with limited space, our guide to small kitchen organization ideas shows how to build vertical and hidden storage so your counters aren't doing the job your cabinets should.
What tools actually make decluttering a kitchen easier?
A few simple containers turn a decluttered kitchen into one that stays that way, the sorting is the work, but the right storage protects it. Clear stackable bins are the workhorse: use them to corral packet snacks, group under-sink cleaners, or contain loose pantry items so a category can't sprawl again. A set of drawer dividers keeps utensils and gadgets from re-mixing into chaos, and a small label maker makes shelves obvious enough that everyone in the house puts things back correctly. You don't need to buy anything before you declutter, in fact, you shouldn't, because you can't size storage until you know what's staying. Shop only after the sorting is done. Once your dry goods are pared down, pairing bins with a labeling system keeps everything findable; our pantry organization labels printable gives you ready-made labels so the pantry you just cleared stays that way.
How long does it take to declutter a kitchen, and how do you keep it that way?
A full kitchen declutter takes most people three to five hours, but you should almost never do it in one sitting, spreading it across zones is what makes it stick. Block twenty minutes a day for a week and finish one or two zones each session, or set aside a single weekend morning and work zone by zone with breaks. The maintenance is easier than the reset: adopt a "one in, one out" rule so a new gadget means an old one leaves, and run a five-minute nightly counter reset. Once a season, do a quick pass through the fridge and pantry to catch expired items before they pile up. Decluttering isn't a one-time event you finish forever, it's a light rhythm that keeps the room from creeping back to chaos. Keep the checklist handy and re-run it whenever a drawer starts fighting you again.
Declutter Your Home Checklist, Free Printable
A room-by-room decluttering checklist with Keep, Donate, and Toss columns plus twelve 20-minute declutter zones, so you can clear the clutter from your whole home one shelf at a time.
Print the checklist, start with a single drawer, and let the zones carry you through the rest. A calm, functional kitchen isn't about owning less for its own sake, it's about giving every remaining thing a home so cooking, eating, and living happen without the friction of clutter in the way.
Frequently Asked Questions
What is the fastest way to declutter a kitchen?
Work zone by zone in short, timed sessions rather than gutting the whole room at once. Clear one drawer or shelf completely, sort into trash, donate, and belongs-elsewhere piles, then put back only what works. Finishing small zones keeps momentum and prevents the half-done chaos that stalls big overhauls.
In what order should you declutter a kitchen?
Start with a quick win like the junk drawer, then move through food-storage containers, under the sink, the pantry, countertops, utensil drawers, mugs and cups, and finally the fridge and freezer. Following a set order means you always finish one zone before opening the next.
What should you get rid of when decluttering a kitchen?
Remove anything broken, expired, duplicated, or unused for a full year. That covers chipped mugs, lidless containers, expired condiments, duplicate gadgets, single-use tools, and promotional cups. A quick test: if you had to rebuy it today and wouldn't, and it isn't sentimental, let it go.
How long does it take to declutter a whole kitchen?
Most people need three to five hours total, but it works best split across zones rather than done in one sitting. Block twenty minutes a day for a week, finishing one or two zones per session, or set aside a single weekend morning and work zone by zone with breaks.
How do you keep a kitchen decluttered after cleaning it out?
Give every item a home, adopt a one-in-one-out rule so a new gadget means an old one leaves, and run a five-minute nightly counter reset. Once a season, do a quick pass through the fridge and pantry to catch expired items before clutter creeps back.